To create an invoice, start by selecting an appropriate format, which can be done using software like Excel, Word, or specialized invoicing platforms. Then, add essential details such as the invoice number, date, client information, and payment due date. Next, list each service or product provided, along with a description, quantities, unit prices, and the total amount due, and add the total at the bottom. Include payment terms, preferred payment methods, and any applicable taxes or discounts.
Enhancing the invoice’s visual appeal with professional formatting, company branding, and optional sections like payment terms or notes can further contribute to its clarity and effectiveness. Finally, save and send the invoice to the client. Ensure it is accessible and in a format that supports easy review and payment processing. This systematic approach ensures that the invoice is comprehensive, accurate, and conducive to prompt payment.
Ever started at a blank page (or document) wondering how to create an invoice? You’re not alone. While invoices may seem like a simple task, ensuring they are professional, accurate, and include all the necessary details can be a hurdle.
This blog is here to be your guide. We’ll walk you through the invoice creation process step-by-step, from understanding key elements to choosing the right format. Get ready to banish invoice intimidation and confidently send clear, professional invoices that get you paid faster.
What is an Invoice?
An invoice is a commercial document issued by a seller to a buyer. It details the products or services provided, their corresponding costs, and the total amount due from the buyer. It serves as a formal record of the transaction and a payment request.
Type of Invoices
There are mainly 6 key Invoice :
- Sales Invoice
- Proforma Invoice
- Recurring Invoice
- Credit Invoice
- Debit Invoice
- Interim Invoice
Sales Invoice: A sales invoice is a document issued by a seller to a buyer, detailing the sale transaction between them. It typically includes information such as the description of the goods or services sold, quantities, prices, payment terms, and any applicable taxes or discounts. Sales invoices serve as legal records of the sale and are used for accounting and financial purposes by both the seller and the buyer.
For eg. After purchasing office supplies from a vendor, he will send you a sales invoice detailing the items, quantities, prices, and payment terms.
Proforma Invoice: A proforma invoice is a preliminary bill sent before a sale. It’s like a preview of the final cost, including a breakdown and timeline, to ensure everyone’s on the same page before you buy.
For eg: Before making a bulk order of electronics for your store, the supplier sends you a proforma invoice outlining the estimated costs and delivery schedule.
To learn how to create Proforma invoices, check our video here.
Recurring Invoice: A recurring invoice is a bill on autopilot. It’s an invoice sent to a customer at regular intervals, like monthly or annually, for an ongoing service or subscription. This saves you the hassle of creating a new invoice each time and ensures you get paid predictably.
For eg: Gyms use recurring invoices to automatically charge members monthly fees, streamlining billing and ensuring steady income.
To learn how to create recurring invoices, check our video here.
Credit Invoice: A credit invoice also called a credit memo or credit note, is a formal document issued by a seller to a buyer that reduces the amount the buyer owes. It acts like a financial record of money credited back to the original invoice. This can happen for various reasons, such as:
- Errors: If the original invoice contained an overcharge.
- Refunds: If a product was returned or the service wasn’t delivered as agreed.
- Adjustments: If there’s a discount applied after the initial sale.
For eg: You return a faulty printer to the electronics store and they issue you a credit invoice which can be used in exchange for future purchases.
To learn how to create Credit Note, check our video here
Debit Invoice : A debit invoice is a document issued by a seller to a buyer to request additional payment for a previous transaction. This can happen for a few reasons. Maybe there was a mistake in the original invoice, like a miscalculation or missing charges. It could also be used if the seller incurs extra costs after the initial invoice, such as unexpected shipping fees. Overall, a debit invoice acts as a formal way to increase the amount the buyer owes.
For eg: The catering company you hired for an event forgot to include the delivery fee in the initial invoice, so they sent you a debit invoice to cover the additional charge.
Interim Invoice:
An interim invoice, also called a progress invoice, is like a progress report for your payments. It’s a bill for a portion of a large project, sent throughout the project instead of one final bill at the end. This helps businesses get paid as they work and avoids surprising the client with a huge final bill.
For eg: A construction company working on building your new house sends you an interim invoice for the completed foundation work, with more invoices to follow as the project progresses.
Different Methods to Create an Invoice
In this blog, we will discuss three major ways of creating an invoice:
1. Using Excel
2. Using Word
3. Using specialized Invoicing Software
1. How To Create Invoice Using Excel
Excel is a powerful tool for creating invoices, offering flexibility through custom designs or pre-made templates. This guide explores both methods, providing insights into crafting professional invoices tailored to your business needs. Mastering Excel invoicing streamlines transactions, enhancing professionalism and efficiency.
- From Scratch: This gives you complete control over the design and layout of your invoice.
- Using a Template: This is a faster option if you don’t mind a pre-designed format.
Steps to Create Custom Invoice from Scratch
- New Blank Workbook: Choose “Blank workbook” in Excel to begin.
- Design Your Invoice Layout (Optional)
- Remove Gridlines: For a cleaner look, navigate to the “View” tab and uncheck “Gridlines”.
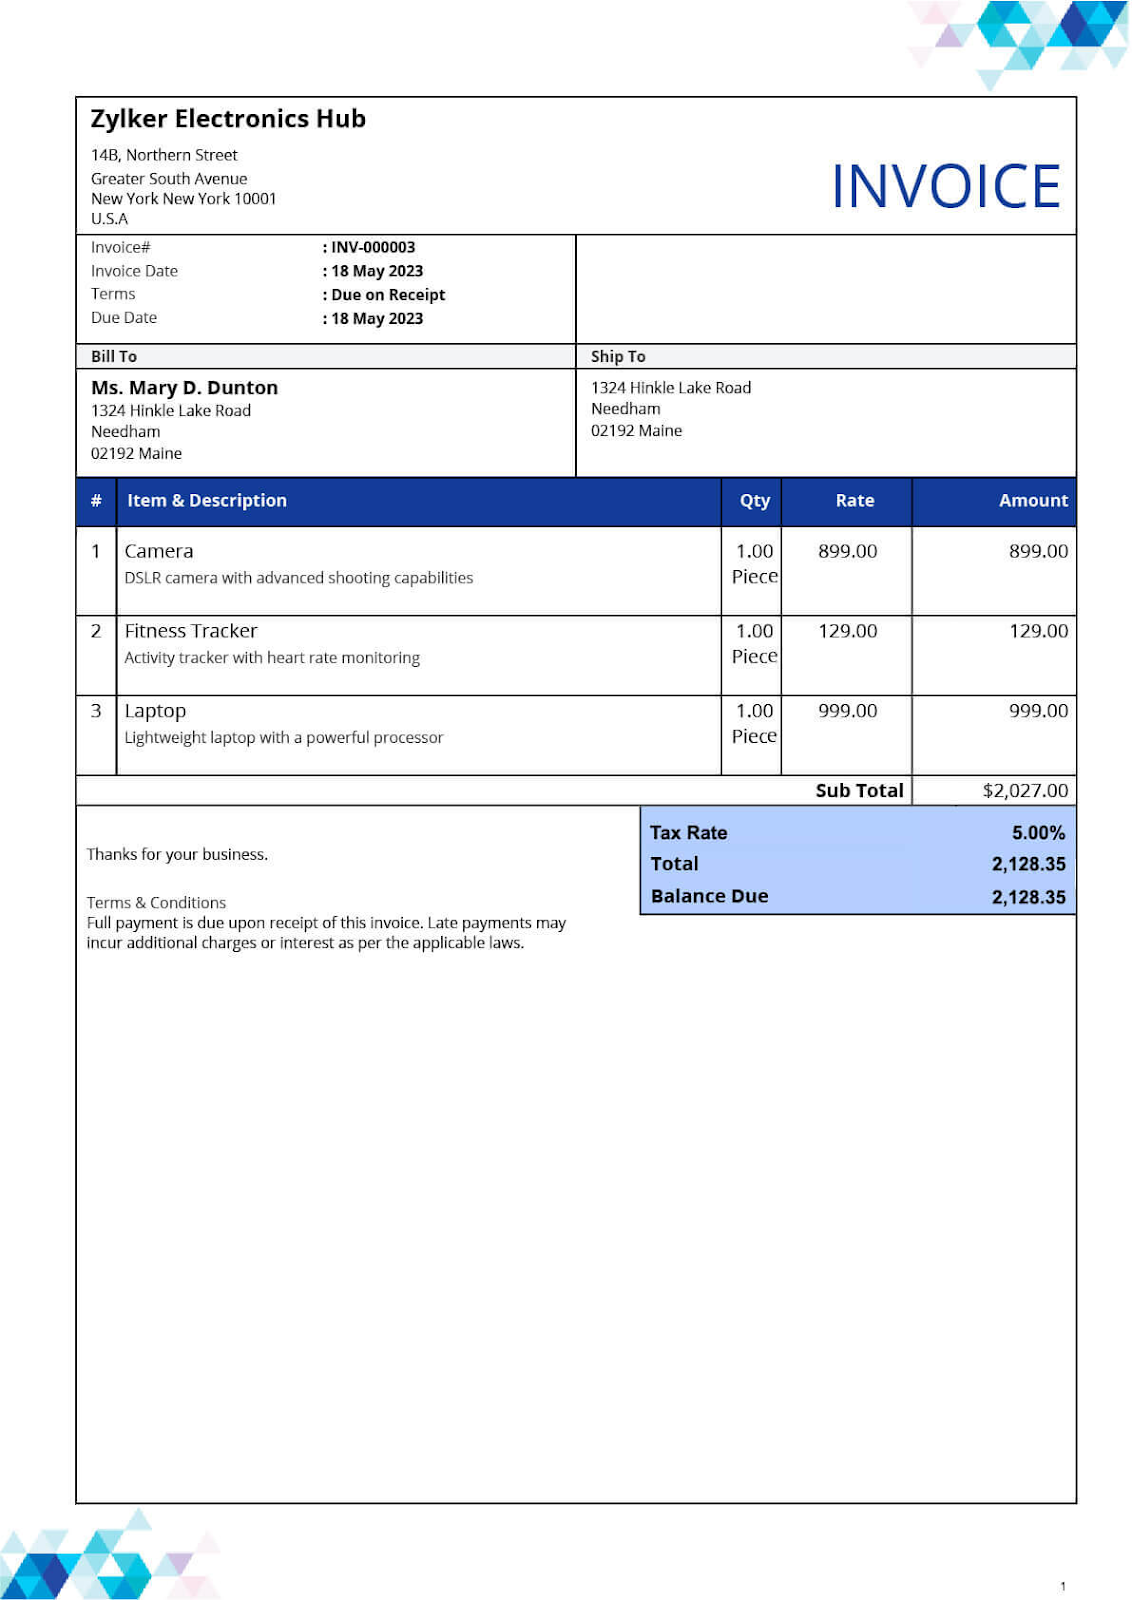
- Headers & Borders: Designate a header section showcasing your business name such as “Zylker Electronics Hub” as shown in the image above.
- Add other details like logo, contact details, GST No. etc. Utilize borders to define sections within the invoice.
- Include Invoice Details:
- Invoice Number: Incorporate a distinctive identification number for each invoice, like “INV-00003”, as demonstrated in the image.
- Date: Specify the issuance date of the invoice.
- Client Information: Add the client’s name, address, email, and phone number (as depicted in the image above.)
- Payment Due Date: Specify the expected payment date
- Create a product/service table: Using a table, create a breakdown of the products or services you provided. Here are some common column titles:
- Description: A brief description of the product or service.
- Quantity: The number of units sold or hours worked (applicable).
- Unit Price: The price per unit or the hourly price of the service.
- Amount: The total price (quantity multiplied by unit price).
- Payment Terms, Notes, and Attachment: You can add sections for:
- Subtotal: The total amount before taxes or discounts (sum of all amounts in the table).
- Tax: The applicable tax amount (if any).
- Discounts: Any discounts offered to the client.
- Total: The final amount due after adding taxes and subtracting discounts.
- Payment terms: Specify your preferred payment methods like bank transfer, UPI, etc., and any late payment penalties if any.
- Notes: Add any additional information relevant to the invoice.
- Formatting and Customization:
- Improve visual aesthetics by modifying fonts, colors, and alignment. For instance, Zykler Electronics has used blue and white colors in their invoice as shown in the image above.
- Consider incorporating your company logo or a professional background.
- Save and Send:
- Save your invoice in a common format like .xlsx or .pdf.
- Send the invoice to your client via email, WhatsApp, or link, or download it as a PDF.
Additional Tips
- Backup Invoices: Store duplicates securely to safeguard against data loss or system failures.
- Automate Calculations: Use Excel formulas for subtotal, tax, discounts, and total to save time and reduce errors.
Ways to Create Invoice Using Invoice Templates
Built-in Templates: Excel offers built-in invoice templates to facilitate easy invoice creation.
Search for “invoice” within the Excel search bar, and you may find several templates as shown below.
Downloadable Templates: Numerous websites like Refrens offer free downloadable invoice templates for Excel in various designs
Benefits of using Invoice Templates:
- Essential Elements Covered: Such templates ensure your invoices include all crucial elements, like invoice number, due date, business/client information, item details, and terms & conditions.
- Faster Than Creating manually: Using invoice templates allows for quicker generation of invoices compared to manually creating them from scratch.
- Time Efficiency: By eliminating manual invoicing processes, templates allow you to allocate time more effectively to core business functions or personal pursuits.
- Competitive Advantage: Presenting professional, well-structured invoices can set you apart from competitors and position your business as reliable and trustworthy.
Using a template streamlines the design and layout process. However, you can still customize the information and formatting to align with your specific needs.
Read more: When Is The Best Time To Send Invoices?
2. How To Create Invoice Using Word/Google Doc
Follow these steps to create an invoice giving a clear and professional look using Microsoft Word/Google Doc
1. Open a new blank document: Launch Microsoft Word and click on “File” then “New Blank Document” to begin creating your invoice.
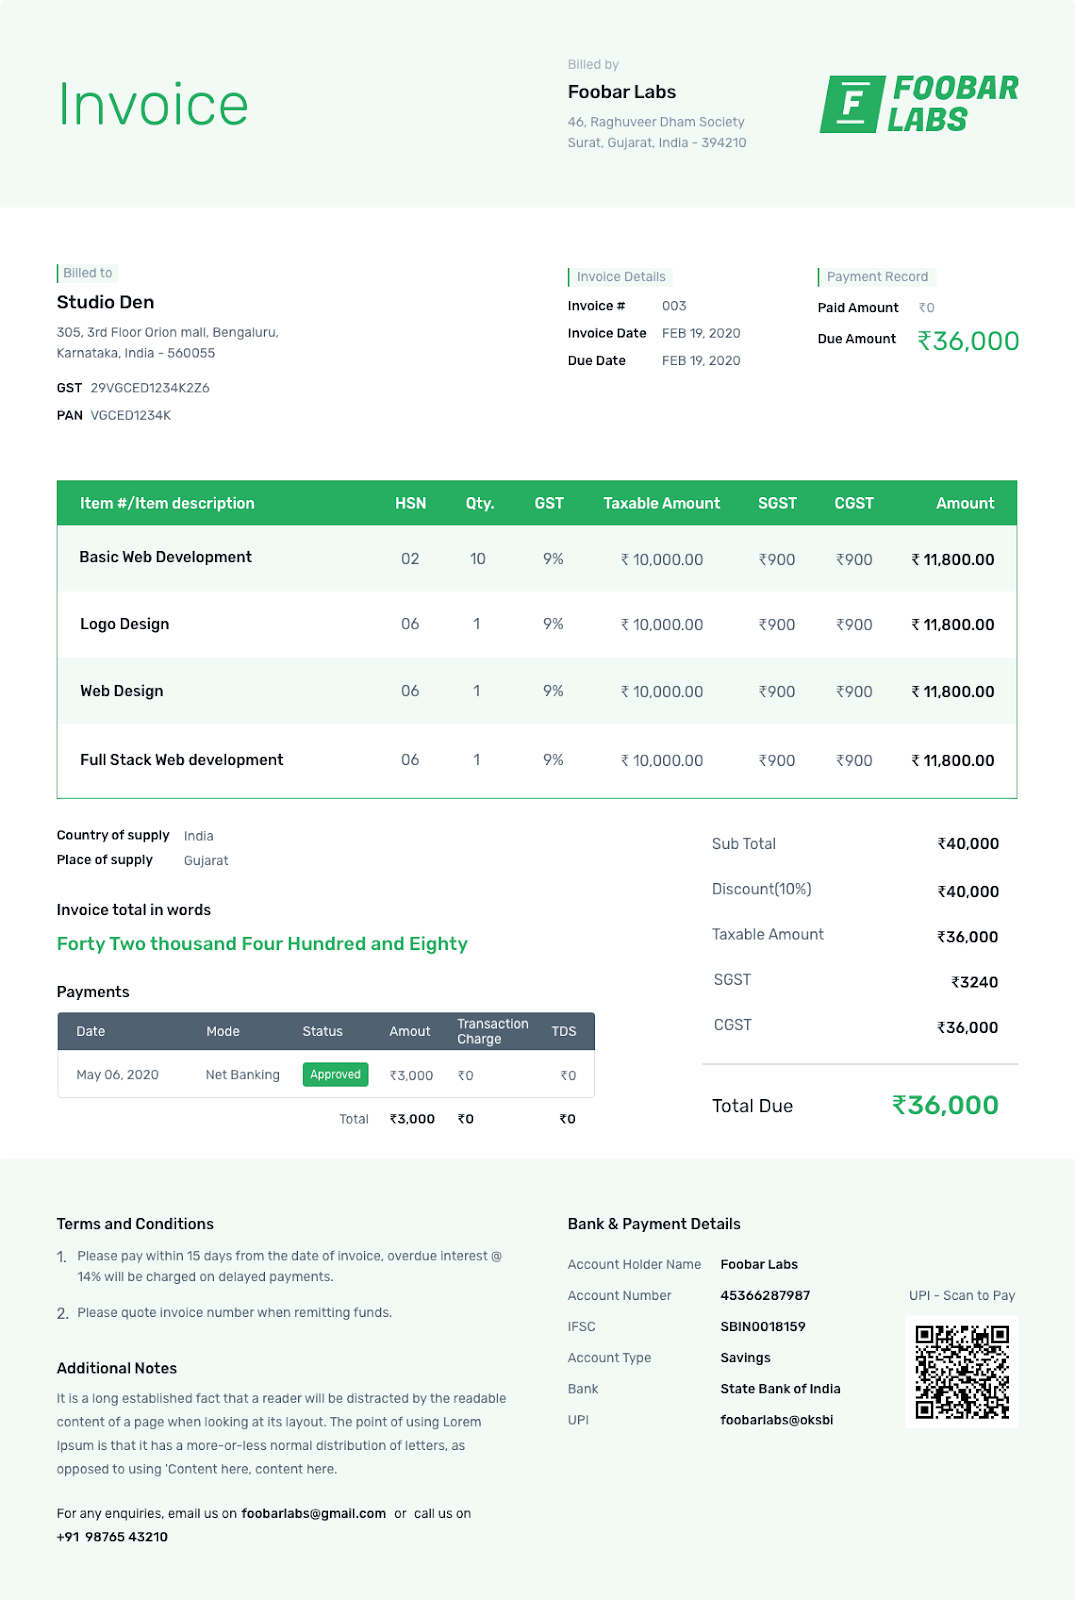
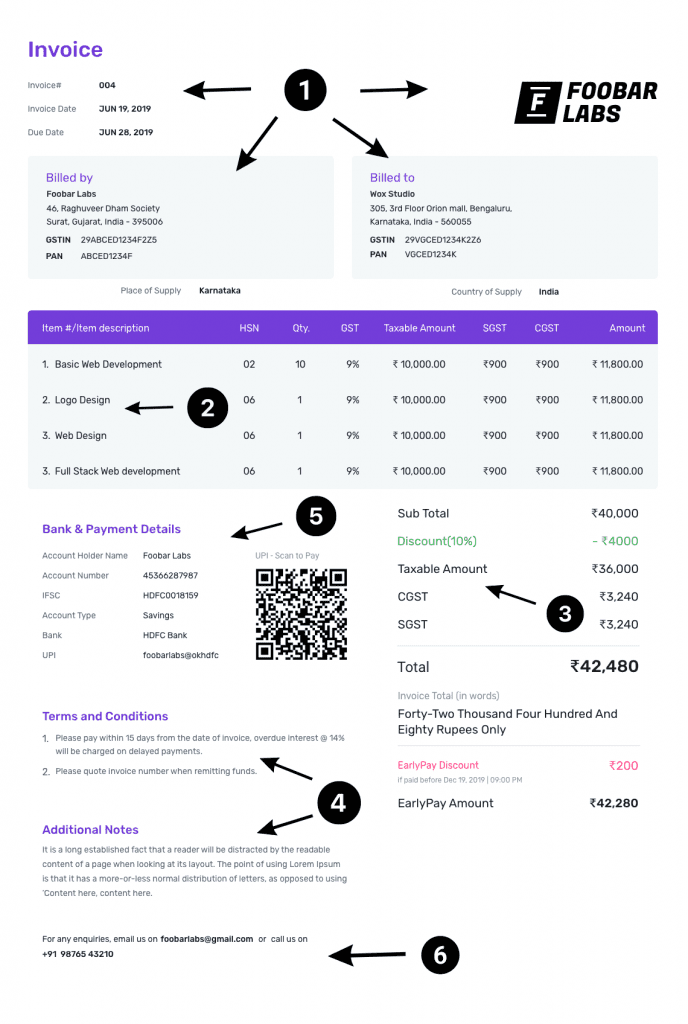
2. Create a header: This section will showcase your business information. Include your company logo (eg. “Foober Labs’ logo” shown in the above image), business name, and contact details like address, phone number, and email address. You can also add the word “Invoice” prominently at the top.
3. Add invoice details: On the right side of the header, insert the following:
- Invoice Date: The date you’re issuing the invoice.
- Invoice Number: Assign a unique invoice number “003” for your records as shown in the image above.
- Due Date: The date by which the payment is expected.
4. Enter your client’s information: Below the header, include your client’s details such as company name, contact person, billing address, and email address.
5. Create a product/service table: Using a table, create a breakdown of the products or services you provided. Here are some common column titles:
- Description: A brief description of the product or service.
- Quantity: The number of units sold or hours worked (applicable).
- Unit Price: The price per unit or the hourly price of the service.
- Amount: The total price (quantity multiplied by unit price).
6. Payment Terms, Notes, and Attachment: You can add sections for:
- Subtotal: The total amount before taxes or discounts (sum of all amounts in the table).
- Tax: The applicable tax amount (if any).
- Discounts: Any discounts offered to the client.
- Total: The final amount due after adding taxes and subtracting discounts.
- Payment terms: Specify your preferred payment methods like bank transfer, UPI, etc., and any late payment penalties if any.
- Notes: Add any additional information relevant to the invoice as shown in the image above.
7. Save and send your invoice: Once you’ve completed the invoice, save it with a clear filename that includes the invoice number
“Eg. Invoice.003.docx” (as shown in the image). You can then send it to your client electronically or as a printed copy.
Here are some additional tips for creating invoices in Word:
- Use a professional font like ‘Helvetica” as used in the above image.
- Align the text and table cells for a clean look.
There are various websites like Refrens where you can find free downloadable invoice templates for Word. These templates can be customized with your business information and come in various designs.
Benefits of Using Word Templates for Invoices:
- Efficiency: Utilizing pre-designed templates saves time and effort compared to creating invoices from scratch.
- Consistency: Templates ensure consistency in the format and layout of your invoices, enhancing professionalism and brand identity.
- Customization: Templates allow for customization to reflect your unique branding and business requirements, providing a personalized touch to your invoices.
- Accuracy: By including all essential elements and details, templates help minimize errors and ensure accurate billing information.
Read more: Top 10 Benefits Of Automated Invoice Processing
Crafting invoices doesn’t have to be a time-consuming chore. Invoice templates offer a quick and professional way to get the job done. Let’s explore two popular methods for creating invoices using templates:
- Find Templates
- Built-in Templates (Microsoft Excel & Google Sheets)
Both Excel and Google Sheets offer a treasure trove of built-in invoice templates. Here’s how to use them:
Excel: Open Excel and head to the search bar. Simply type “invoice” and browse the available templates. Select the one that best suits your needs.
Google Sheets: In Google Sheets, navigate to the “File” menu and then “New” -> “Template Gallery.” Search for “invoice” and choose your preferred template.
- Downloadable Templates
Several websites, like Refrens, provide a library of free downloadable invoice templates. Here’s how to leverage them:
Visit the Website: Head to a website offering invoice templates for Word, like Refrens (search for “invoice templates” on a search engine).
Download the Template: Browse the available designs and download the one that aligns with your brand or preference.

3. Fill in the Information:
Once you’ve chosen a template and opened it in your editing software, it’s time to fill in the information. Here are the key things to include:
- Your Business Information: Name, logo, contact details.
- Customer Information: Name, contact details.
- Invoice Details: Invoice number, date, due date.
- Line Items: Description of product or service, quantity, price per unit, and total amount.
- Totals: Subtotal, tax (if applicable), discounts (if applicable), and grand total.
- Payment Terms: Specify how you accept payment and the due date.
4. Customize:
Most templates allow you to customize the design to match your brand. You can change fonts, colors, and add your logo.
5. Save and Send:
Once you’ve filled out the information and customized the design, save your invoice as a PDF for easy sharing. You can then email it to your client or send it another way.
Additional Tips:
- Keep your invoices consistent by using the same template for all your clients.
- Use clear and concise language.
- Proofread your invoice carefully before sending it.
- Consider using invoicing software for more advanced features, such as automatic reminders and online payments.
Benefits of Using Invoice Templates:
- Save Time: Templates eliminate the need to design an invoice from scratch, saving you valuable time.
- Professional Look: Pre-designed templates ensure a polished and professional look for your invoices.
- Consistency: Templates help maintain consistency in your invoicing format, making it easier for clients to understand.
- Accuracy: Built-in formulas in spreadsheet templates can help minimize errors in calculations.
- Customization: Most templates allow for customization, so you can add your logo, branding elements, and specific information.
By utilizing invoice templates, you can streamline your invoicing process, project a professional image, and ensure your clients receive clear and accurate billing information.
3. How To Create Invoice Using Invoicing Software
While invoicing software is known for simplifying the creation and sharing of invoices, let’s take a step back. Understanding what invoicing software actually is, will help you leverage its full potential.
What is an Invoice or Billing Software?
Invoicing and billing software are digital tools that simplify the invoicing process of creating, sending, and tracking invoices. Imagine ditching the spreadsheets and manual calculations! These solutions streamline your workflow, saving you valuable time and minimizing errors.
Here’s a breakdown of key functionalities:
- Invoice Creation: Generate online invoices with customizable templates, including your logo, branding, and contact information.
- Automated Workflows: Expedite repetitive tasks like adding line items, calculating taxes, and applying discounts.
- Payment Processing: Accept online payments securely through integrated payment gateways, allowing clients to pay via credit card, debit card, or ACH transfer.
- Client Management: Store customer information securely and organize your client base for easy reference.
- Reporting & Analytics: Gain valuable insights into your invoicing trends, outstanding payments, and overall financial health.
Read more: Finding the perfect invoice management software
What is Cloud Invoicing Software?
Cloud invoicing software takes the convenience of invoicing and billing software a step further. These web-based applications reside on remote servers, accessible from any device with an internet connection. This eliminates the need for software installation or updates on your computer.
Here are some of the advantages of cloud-based invoicing:
- Accessibility: Access your invoices and financial data from anywhere, at any time.
- Security: Cloud providers offer robust security measures to protect your sensitive financial information.
- Automatic Updates: Benefit from the latest features and bug fixes without manual intervention.
- Scalability: Cloud solutions can adapt to your business growth, accommodating an increasing number of invoices and clients.
Read more: Common invoicing challenges for business and how to solve them
How to Create an Invoice?
By utilizing invoicing software, you can streamline your billing process, save time, and ensure professional, error-free invoices for your clients.
Here’s a general breakdown of the process:
- Choose your software and set up your account: There are many invoicing software options available, both free (like Refrens) and paid (like Scoro). Consider features, pricing, and ease of use when choosing.
Check our comprehensive list of the top 15 invoicing software to choose which software suits the best to your needs. - Create a new invoice: Most software will offer a “New Invoice” button or similar option to get you started with creating a new invoice.
- Enter your information: Fill in your business details, logo, your contact information, etc.
Add client details: Typical client details consist of the client’s company name and address. You can also add other information like their GSTIN number, PAN number, mobile number, etc. - Itemize your invoice: Here’s where you detail your products or services: Enter a description for each item. Specify the quantity provided, and set the price per unit. The software will automatically calculate the total cost for each item.
- Add taxes: Invoicing software helps you with easy configuration of taxes.
- Set payment terms: Clearly state the due date for payment and any late fees (if applicable).
- Customize: Some software allows adding notes, thank you messages, or customizing the invoice layout for a professional touch.
- Review and send: Double-check all information before sending the invoice electronically to your client. Most software lets you send the invoice directly via email.
Read more: Best Practices For Creating And Sending InvoicesTo Clients
Why Use Software?
Ditch the spreadsheets and manual calculations! Invoicing software offers a powerful solution to streamline your billing process and save you valuable time. Here’s why you should consider making the switch:
- Effortless Efficiency: Automate repetitive tasks like adding line items, calculating taxes, and applying discounts. This frees you up to focus on what matters most – growing your business.
- Say Goodbye to Errors: Relying on manual calculations increases the likelihood of errors. Invoicing software guarantees precision through automated calculations and data input, effectively maintaining the accuracy of your financial records.
- Professional Polish: Create automated invoices to save time and manual work and impress your clients. Software often provides templates and customization options to craft invoices that reflect your brand identity.
- Effortless Organization: Manage client information securely and organize your client base for easy reference. No more scrambling to find past invoices or contact details.
- Valuable Insights: Gain valuable data on your invoicing trends, outstanding payments, and overall financial health. This information empowers you to make informed business decisions.
Read more: Everything to know about Invoicing
List of Top 3 Invoicing Software to Create Invoices with Ease
1. How To Create An Invoice on Refrens?
Refrens is trusted by over 150,000 businesses worldwide for its comprehensive management of leads, sales, accounts payable/receivable, accounting, and taxes all within one centralized platform. Additionally, Refrens offers the convenience of generating professional-looking invoices in just minutes, providing users with a quick and efficient solution.
Here’s a quick guide:
1. Create a New Invoice
- Go to your Invoicing Dashboard and click “Create New Invoice.”
- Fill in the invoice header details (invoice number, date, due date). And any additional details if you want, like client number, etc.
- Add your logo and billing details.
- Select your client from the dropdown or add a new one.
2. Customize Invoice Items
- Rename or add columns depending on your needs (e.g., service, quantity, rate).
- You can also use formulas for custom calculations, for example, the total amount charged for hours worked, etc.
- Mark columns “Private” for internal use only.
- Add descriptions and images to your invoice items.
- Organize items into groups if needed.
3. Add Discounts and Charges
- Apply discounts to individual items or the entire invoice.
- Include additional fixed charges or percentage-based charges.
4. Final Touches
- Refrens provides a host of templates and easy customization options for colors, fonts, headers, footers, script, etc to align your invoice with your brand communication.
- You can add terms and conditions, notes, attachments, and contact details.
- Include your signature for a professional touch.
- Set up recurring invoices for ongoing projects.
- Provide professional contact information, including an email address and phone number, for inquiries.
5. Send Your Invoice
- Enter your bank or UPI details for easy payments.
- Enable early payment discounts to incentivize faster payments.
- After finalizing, send the invoice electronically (email/WhatsApp) or provide a downloadable link/PDF. Print for physical copies.
Key Takeaways
Refrens offers a user-friendly interface for creating and customizing invoices.
You can tailor the invoice to your specific needs with various features.
Sending and receiving payments is made easy with integrated options such as credit cards, bank transfers, or online payment gateways
Read more: Invoice Like A Pro: A Comprehensive Invoicing Guide
2. How To Create an Invoice In Busy Accounting Software?
Busy software tackles accounting for small and medium businesses, particularly in Asia and Africa. It streamlines tasks like invoicing, expense tracking, and inventory control. Busy even ensures compliance with India’s Goods and Services Tax (GST), and offers a mobile app for handy financial management.
- Open Busy Accounting Software: First, open the Busy Accounting System on your computer. Look for the program icon and double-click to launch it.
- Navigate to Sales Vouchers: Once inside the software, find the section related to sales transactions or invoices. This area is where you’ll create your invoice.
- Create a New Invoice: Click on the option that allows you to create a new invoice.
- Enter Customer Details: In the newly opened invoice, you’ll see fields for customer information. Fill in the following details:
- Customer Name: Enter the name of the person or business you’re invoicing.
- Address: Include the customer’s address.
- Contact Information: Add their phone number or email address.
- Add Product/Service Details: Now let’s list the items you’re selling. For each product or service:
- Product/Service Name: Type in the name of what you’re offering (e.g., “Widgets,” “Consulting Services,” etc.).
- Quantity: Specify how many units of the product or service the customer is purchasing.
- Price: Enter the price per unit (the cost of one widget or one hour of consulting, for example).
- Total Amount: This field will automatically calculate the total cost based on the quantity and price.
- Review and Save:
- Take a moment to review the invoice. Make sure all the details are accurate.
- If everything looks good, save the invoice. You might find a “Save” or “Finalize” button for this.
- Print or Send Electronically:
- Finally, you can print a hard copy of the invoice by clicking Ctrl+P.
- Alternatively, if you want to send it electronically, save it as a PDF file using Ctrl+E.
3. How to create an Invoice on SAP?
SAP software empowers large corporations with a robust ERP solution. It integrates diverse departments, fostering data flow and streamlining workflows. While adept at handling massive data, SAP also tackles routine tasks like invoice generation.
Here are the steps to create an Invoice in SAP:
- Open SAP: First, log in to your SAP account.
- Navigate to Invoice Creation: select the invoice creation option
- Choose the Type of Invoice: SAP allows different types of invoices, such as:
- PO Invoice: For purchase orders.
- Non-PO Invoice: For transactions without a purchase order.
- Credit Memo: For adjustments or refunds.
Select the appropriate type based on your situation.
- Enter Vendor Details: If you’re creating an invoice related to a vendor, enter the vendor’s information. This includes their name, address, and any other relevant details.
- Fill in Invoice Details: On the invoice form, provide the following information:
- Invoice Number: Assign a unique number to the invoice.
- Invoice Date: The date when the invoice is issued.
- Itemized Details: List the products or services being invoiced, along with quantities and prices.
- Total Amount: The sum of all items.
- Additional Notes (if needed): Any relevant comments or instructions.
- Save the Invoice:
- Click the “Save” button to record the invoice in SAP.
- Review and Validate:
- Double-check all details. Make sure the amounts are accurate.
- If everything looks good, proceed to the next step.
- Print or Send Electronically:
- You can print a hard copy of the invoice using the appropriate option.
- Alternatively, save it as a digital file (PDF) for electronic distribution.
What is the Best Invoice Software?
While the blog post explores various invoicing solutions, Refrens emerges as a champion for several reasons. Firstly, its focus on user-friendliness makes it perfect for busy entrepreneurs in India. Unlike complex accounting software, Refrens allows to create invoices and manage finances effortlessly, regardless of accounting expertise. This translates to significant time saved and less frustration compared to manual methods.
Refrens offers more than just standard invoicing services. It provides a complete package comprising expense management, reporting utilities, and inventory control – all within a single platform. This integration eradicates the necessity of utilizing various software applications, thus enhancing workflow efficiency and conserving both time and financial resources.
With features such as Financial Analysis, Inventory Management, Expense Management Software, Delivery Challan, GST Billing Software, Multi-Business Management, E-Invoicing Software, Bookkeeping Software, Accounting Software, e-way bill software, Quotation Software, Lead Management Software, Sales CRM, and more, Refrens caters to diverse business needs seamlessly.
Finally, Refrens ensures easy tax compliance, like GST for India. It generates GSTR-1 reports and facilitates GST filing, taking a major weight off your shoulders. With a free plan available and affordable paid options, Refrens caters to businesses of all sizes. It’s the undisputed champion for streamlined invoicing and financial management in India.
Read more: How To Choose The Best Invoice Management Software? Essential Factors to Evaluate
Conclusion
Invoicing is a critical aspect of business operations, and choosing the right tool is essential for efficiency and accuracy. While Microsoft Excel and Word offer basic invoicing capabilities, specialized software provides advanced features to streamline processes and improve productivity. Whether you opt for traditional methods or dedicated invoicing software, prioritize finding a solution that aligns with your business needs and growth goals.
Related Posts:
 Top 12 Best Billing Software For Small Businesses
 How To Create GST Invoice In Shopify?
 Top 16 Invoicing Software For Contractors
 Create An Estimate: Everything You Need To Know Before Creating a Cost Estimate (2021)
 15 Best Invoicing Software In 2024
 8 Top E-Invoicing Software To Create E-Invoices Seamlessly
 How To Create GST Invoices In 2 Minutes?
 Top 11 Billing Software For Retail Shops & Distributors
 How To Invoice For Freelance Work?
 10 Best Invoicing Software For Textile Shop
 Basic Finance Terms Every Small Business Owner Should Know
 Top 7 Most Trusted Invoice API to Automate Invoicing For Your Business
 Invoice Like A Pro: A Comprehensive Invoicing Guide
 Top 10 Benefits Of Automated Invoice Processing
 How To Choose The Best Invoice Management Software? Essential Factors to Evaluate
 10 Best Invoice App For Shopify
 What Is A Shipping Invoice: Examples and Use Cases
 10 Best Invoicing Software For Self-employed